Wednesday

MDS calendar saga continues. . . .

I'm back with the next installment!

Here is the April page, featuring one of my
favorite photos currently. . .
You may have seen a peek at this first
one if you have been to my
facebook page.

(I will show you the original photo
at the bottom of the post, for comparison)


This layout isn't much of a layout.

However, it is all about the feeling I
get when I see that photo.
Reading is so important in my home.
I am doing my level best to raise
my girls to love reading
as much as their mommy does.

It's kindof a magical picture for me :)

Speaking of magical,
so is cupcake batter. . .
Magically Yummy!

Hence the May page:


Classic!

I *love* how the top note shape
points to my baby's
yummy little face!

A fun tradition since moving to PA
is our favorite little farm. They grow so
many things. Including all
the fun "picking fruits"

Here are the girls picking some
Strawberries for the June page:


Only two more installments of MDS, and
you will get to see some fun new
sneak-peek things from the Spring Occasions
Mini catalog and Sale-a-Bration!!!

Some of the cutest dang things since. . .
the last Occasions catalog! LOL

What is it about the spring Mini that
gets me all verklempt?

Here is the favorite I wanted to share:


I have been playing around with Aperture
on my DSLR and trying to get some fun
effects. . .like the overexposure here.

Fun times :)


Monday


Happy Monday! If that's possible :)

IMPORTANT NOTE: IF YOU ARE A SENIOR
MEMBER OF MY FAMILY WHO HAS
ACCIDENTALLY STUMBLED UPON MY
BLOG, DO NOT READ ANY FURTHER!

!!CHRISTMAS PRESENT SPOILER ALERT!!
pssssshew! That was close!

The stamping that has been happening around here
this month has been primarily digital. . .

Do you have MDS? Do you have any idea
what that means?? LOL

My Digital Studio comes in various options,
but it is a digital design software using all
Stampin' Up! artwork and exclusive colors.

I am making calendars for Grandparents this year,
and did last year also. This year's gift comes with a
scrapbook to put last year's pages in :)

January's page:


I do not profess to be an MDS expert, as I am
just figuring everything out.

(I will tell you however, that digital art
from Stampin' Up is compatible with other
programs, and you can use non-SU artwork
with MDS! Go Crazy with it!)

I tend to like lots of color and contrast,
with minimal "fuss" so far. . .

And always, the primary focus is the picture
of my babies. . .because that's what they really
want to see anyway!! Or maybe that's just me?

February's page:


I made sure to do plenty of pages with both
girls, and each of them have a couple where
they are the focus. Especially their
birthday month. . . .

March page:


I plan to share all the pages. . .some are
better than others! One thing I will say is
that every time I use MDS I learn something new
and cool! I also have been scoping out:

mydigitalstudio.net

Here you will find lots of videos and tutorials,
digital pages, and inspiration for projects.

Next will be April/May/June!
There is a sneak peek on my facebook page
using one of my FAVORITE photos currently.
And if you haven't liked my facebook page yet?

As my baby girl would say:
"Pretty Please on a cherry on top!"


Saturday

Freaky Clean. . .


Here we go again!

The Freak tour has arrived, and this month we are
keeping it nice and clean for ya :)

Clean and Simple (CAS) that is!

You may have arrived here from Jan Tinklenberg's blog,
or maybe you were stopping by to see me?? Awwww!

Either way, you can make the loop around and see some
fabulous projects, all CAS, and all Stampin' Up!


My first project is one of my favorite-the scalloped
square notecard made with the BigShot.


I had some fun with the Stripes Textured
Empressions Embossing folder. . .little slanted
stripe for interest!

Sometimes your favorite people need a little happy mail.


Look at that darling little percolator stamped with
Stazon on Brushed Silver cardstock! Supa Cute!

I used my hobby blade to cut the inside of the handle. . .


Now *this* is my kind of treat holder!


I made this using the Movers and Shapers XL Die,
adding a few score marks. . . .


A top note, not full size, to keep it closed
and make it purty.

And then some coffee, to make it all better.


Because it cures what ails ya. :)

Hope you had fun taking a peek at my projects, and
now it's time to head over to Dawn Olchefske's
blog! Have fun, and see you next time!


Sunday

Digital Scrapbooking!

I've never shared an MDS (My Digital Studio)
page on my blog before??

How can that be?

I made an entire calendar last year for family
Christmas gifts, which they loved.

Or so they tell me! LOL

It is a software program that lets you turn
your favorite photos into something
FABULOUS.

Then you get to make whatever you want
from it! Like what? Calendar pages, drop in pages
for your scrapbooks, journals, the list goes
on and on! Plus you get hostess benefits on both the
Product *and* the professional printing! Hubba Wha?

I could talk your ear off for a while, but instead
I will say Pretty Please just ask if you have
any questions about this versatile and fun product!

I have decided to share my pages from last
year with you, but first this page from this year. . .

We had so much fun this year with our
Nightmare Before Christmas theme!

Our favorite Halloween Movie EVER.
Okay, that and the Wizard of Oz.

Technically not a Halloween movie,
but that is always when we watch it!

Check out my babies:


Shock and Zero!
Can you even STAND IT!

And what's more? I actually made the
costumes (for the kids) this year, which I never do.

It was fun!
And speaking of fun. . . I will share with you:


It snowed half a foot two days
before Halloween! Crazy!


My baby (okay, she's three-sniff) was splashing
in the wet puddles everywhere. . .

This one was taken by the photographer who
was at my Hubby's company party.

We won the couple's costume contest!


And finally, a messy favorite of mine :)


Hope I didn't bore you! We love
Halloween around here.

Can't wait for next year :)

Wednesday

The Freaks are at it Again!


So excited to show you a couple fun things this month!

If you have just arrived here from the lovely Cindy Major's blog,
I'm sure you are still reeling from her creative talent!

If you are just arriving, click on the link at the bottom
of this post and you will make the rounds to some amazing projects
using 100% Stampin' Up products. As always!

To start, I made a little purse gift box:


You could easily hang this on a door handle also (my favorite)
as a surprise for your favorite friend or family member. . .

The focal point, as well as the box use my favorite:
Spice Cake Designer Series Paper


Plus lots of pearl bling!

This is the inside view. . .If you don't have a Simply Adorned
Charm and necklace I demand you get one immediately!


They are too gorgeous, and versatile, to pass up.

This one is going to pull double duty as a Wine Tag
for the lovely person who cooks me Thanksgiving dinner.

Any takers???


Looks like I will be wearing this one myself. :)

Link
I'll break these projects down for you when you aren't
enjoying our lovely Freaky blog tour!

Head on over to Gretchen Barron's blog and be inspired!
Thanks for stopping by!


Saturday

October is HERE!


I am in my element :)

I have already watched Nightmare before Christmas several times.

No, I am not kidding!

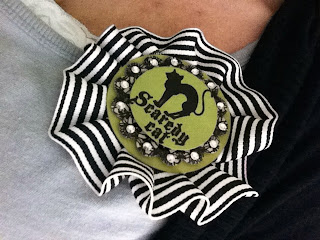
To celebrate entering my absolute favorite time of year I made a pin
that SHOUTS Halloween at you! I love this holiday!

Just being silly and having lots of family fun. . .


Don't you just love it??? Say yes!
I have been wearing it all day.
The day before that? It was living on my bag.
It makes me happy.

Another reason to celebrate October is a new Online Class!!!
Better yet, the class is free!!!

This is the first project in a set of tutorials that will be given (free of charge)
to anyone who places an online order of 35.00 or more from my website!


In conjunction with my friend Emma over at Lady and the Stamp,
We are pleased to offer you the very first project in our
Online Ordering Tutorial Blitz!

If you place an online order through my website of a $35 value or more you will receive NINE step-by-step tutorials FREE OF CHARGE, delivered direct to your email.

We have included everything you need for your Halloween Celebrations!

All projects are planned around the Frightful Sight Suite of Products :

Scaredy Cat Stamp Set

(wood mount-122555) $19.95 or

(clear mount-122557) $14.95

Frightful Sight Designer Series Paper (122351) $10.95

Black 1 ¼” Striped Grosgrain Ribbon (115615) $9.95

Totaling $35.85 for clear mount or 40.85 for wood mount


Check back over the next few days for more fabulous sneak peaks!

Can't wait to share some more fun projects!

(To take a hands-on class with these projects locally, contact me via my Stampin' Up Website and we will get you signed up!)

Amazing Deal this Month!


Wow! I am completely blown away by the promotion this month!

If you have ever considered the benefits of being a Stampin' Up! Demonstrator,
even if it is only for the Freebies and the Continual Discount of products???
How about another $100.00 of stuff for free?!?!

Here is a scenario of my end of the
conversations I will be having this month. . . .

Here have a Big Shot Die Cut Machine!
It's the best thing since, well, anything!

Don't want one? (Crazy, but Okay. . .)

Ohhhh, you already HAVE one! (that explains it!)

Well here-just choose 100.00 of
whatever you want instead.

Yes, you heard me right.

No, you don't have to demonstrate anything. Ever!

No you don't have to buy anything else. Ever!
But if you do want to, it is at a minimum 20% discount!

Yes, I am in complete control of all my faculties.

No, I agree, there really isn't a downside!


Wowsa.

Here is where YOU say:

Let me test my understanding here. . . .
You mean, you are giving me a ton of stuff for about 40% off retail. . .
and then you are going to give me 100.00 to spend on
ANYTHING I WANT???

I think I love you. <3

If you would like specific details or have questions
you would like answers to, I would love to make everything
crystal clear for you. There really is nothing to lose here!

You are basically shopping with a GIGANTIC coupon this month :)

You can sign up in moments on my Stampin' Up Website
(just click on Join now, and make your selections,
my password is "spinner"), or give me a call/email and we can chat specifics.

Have a fabulous October!

Tuesday

A gift from Barbie

Look at this beautiful card that was given to me
from my friend and sideline Barb!

Isn't it just gorgeous?


A group of my friends, the Michigan Minglers as we call ourselves,
were swapping over the end of the summer. Because I couldn't
swap, Barb gave me this as a gift!


Thanks for letting me share, Barb :)

I love my Minglers!

Sunday

30 Second Window Cards. . .

Halooooo!

I am here to show you how to make a window in the front of your card.
I use this to show off fun little images, or punch art
(as you have seen in the last two posts).

Now, a disclaimer: Any stress induced by the sight of my messy desk
is in no way to be blamed on me! I can't help it! It just happens!

If you have been to my Facebook page,
you have seen firsthand the crazy fallout. . .

This is me apologizing in advance!
If I waited for it to be clean to take photos??
Nothing would get done!

Here goes. . . .

To start, I determine where I want the opening to be on the front of my card.

In this case, I just set a punched circle with the Ghost adhered to it on the
front of my card and moved it around until I had an idea of where I wanted it.

Right about here. . . .
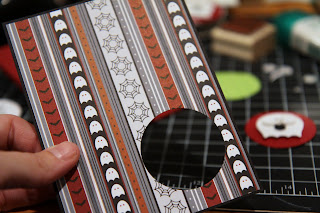

It is okay to punch your cardstock with a layer
of Designer Series Paper on it.

Two layers of cardstock?

No No!
Don't do it, girlfriend. Bad for your tools!

So what now?? Here is what I do:

Using the same punch as the original opening on the card front,
punch a hole from a post-it note.

Be sure to punch part of the sticky strip on the back!


Place your cardfront onto the card base.
Please don't adhere it with permanent adhesive!

I used dotto, so I could hold it up/check it out/take it back off when I want.

Once you have it just where you want it. . . .


Take your sticky note, and put it in the opening.
Give it a little rub for luck.
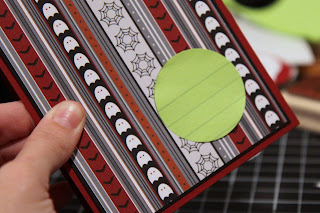

At this point, because you have NOT used permanent adhesive,
you should be able to pull off your front layer with ease.

I keep my thumb on that post-it so it doesn't move while I pull the layer off.
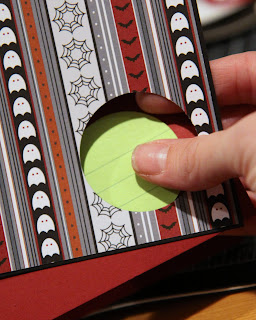

There it is, just telling you what to do!
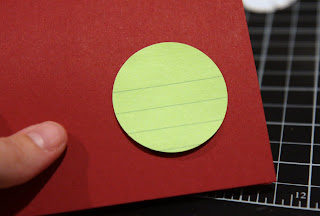


You should be able to carefully move your punch over it
so you can make a perfectly lined up opening.

Try not to knock it off while getting the punch in place. . .
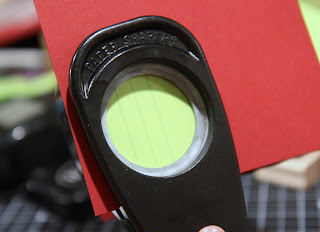

Peek-a-boo!
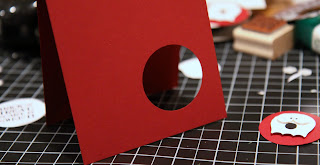

You are all set to use permanent adhesive now! LOL

For my card, I then punched a black circle and
glued it down right thru the opening so it would be in just the right spot.
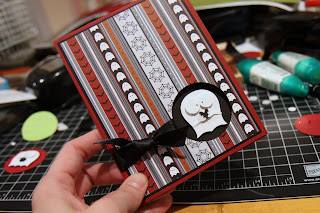

I had that little ghost set down on my desk, sticky side up. . . .

Took me a while to find him!
He was stuck to my Stazon lid. . .
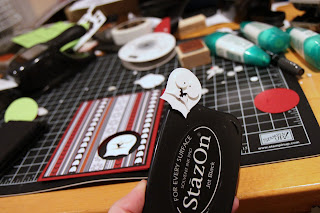

The little stinker!

Hopefully that was helpful for those of you who may not
have made a card like this before. Easy and fun!

You can also use a punched post-it to find the perfect placement for your
front layer. Just stick it where you like it best and punch!

Another example of a window card-same layout/different image,
can be found here. The difference being, I used a smaller opening.
Not revealing the entire image can be fun! Keeps 'em guessing :)

Are these tutorials okay? Too many pictures? Too few? Too wordy?
I am new at this and would like to make sure that everything is clear
and would appreciate any feedback or suggestions you may have!

Thanks :)

Saturday

Owl Cuteness. . .


Since I have been having so much fun with the Owl Punch lately,
how about an actual owl?

All the ladies in my family LOVE owls.
The owl punch in the Stampin' Up! catalog is tons of fun for us!


I made this birthday card while brainstorming
for my daughter's birthday party invitations.

It is the same layout as the Scary Sweet Ghost card,
but instead of the larger opening the 1 3/8 circle punch is used.

The sentiment is from the set Bring on the Cake,
punched with the Scallop Oval Punch.


I dotted the eyes like I have been lately-
with a Stampin' Write marker (Basic Black).

Not only would it be a time saver if I ended up making a lot of these. . .
I really like how it looks a little more animated.


He makes me smile :)


The birthday hat was made with the Petite Pennant builder punch,
in addition to the retired Trio Flower punch.
The branch is the Little Leaves sizzlit in Wild Wasabi.

Do you have the Owl Punch??
You should! Order 24/7 from my website.

Next, I will share with you how I make my window cards,
and how I line up the front layer with the card base.

Enjoy your Sunday :)

Supplies:
Stamps: Bring on the Cake, Woodgrain background
Ink: Soft Suede
Paper: Soft Suede, Crumb Cake, Whisper White
Wild Wasabi, Just Add Cake Designer Series
Other Stuff: 1 3/8 circle punch, Owl Punch, Little Leaves sizzlit, Big Shot, dimensionals

Thursday

Everybody needs a buddy. . .

Hello, Lovelies!

As promised, I am here to show you my second little ghost
made from Stampin' Up's extra cute Owl Punch!

See? Isn't he a sweetie?

He wants to give you his heart <3


Or maybe he is just screaming in fear. . . .you be the judge!

I love to make these window cards. Have you ever made one?

In case you haven't, I plan to show you how I do it. . .but today
I am going to show you how I made this little guy's fun little self.


The one in the middle is from this project, and I explained how I made him
in this post. You really need to have seen that one to pick up at this point, so
if you haven't? Go do that now! Then hop back over here. . . .

Here we go for ghost #2:

At this point, you have already punched the owl body, and trimmed off his
poor little legs. . .but this time you will finish the bottom with the Curly Label Punch.


Try and center the little point if you can.

Now you need a second little owl from the Owl Punch. . .
because feet will become hands!

Trim up into the body to make some little arms. . .


Go ahead and punch yourself a little black heart-also from the Owl Punch.

At this point, I just put some tombo on the scrap, and dabbed a bit
on the back of his little hands. If you have little tweezers they are handy.


A piercing tool to put a bit of pressure on it for a second while the glue sets.
Again for the other side, please!


If you cut a tiny edge piece from your sheet of dimensionals,
it will be the perfect size for the back of his little heart.

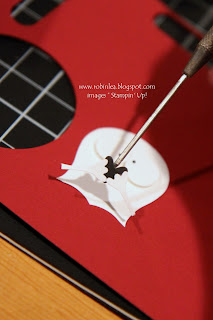
I used my piercing tool so I could see what I was doing here. . .

The heart will be adhered, but his little arms need to be attached at the shoulder,
so a little glue on your piercing tool will place it in the right spot without much trouble.


Give it a pinch so it sticks well!


Awwwwww!


If his arms extend past his body, use your Paper Snips or
a hobby blade to remove the excess.

The sentiment (Grateful Greetings) is so perfect as
this little ghost is supposed to be scary but instead he is sweet :)


Okay, I'm done! LOL

I hope you like him, and that you make something fun.
Send me a link if you do!

As always, everything used is Stampin' Up.
Order anytime on my website, and let me know if you have any questions :)