Showing posts with label 3D projects. Show all posts

Wednesday

BLOG TOUR~The new Freakin' Catalog!


 How about that new delicious Idea Book and Catalog?!?
I have been looking and dreaming over it ever since it came to my house. . .

The freaks wanted to show you some fun projects using new catalog
stamps, acessories, ie. deliciousness, so here we go!

(Working backward? No worries!
Here is Justin rocking the new products)


 I've made two things for the tour today.  The first is a clean and simple
note card using the new showstopping set:  Regarding Dahlias (130324)

We are making this card at my July 2nd stamp camp-
 Bermuda Bay is so gorgeous with the black and white!

My 10 year old daughter informed me that "the style" is black, white,
and bright-so I guess she inspired me here :)


Using Stazon Jet Black Ink (101406) on white paper, and 
choosing a bright color with your blender pen 
makes for some dramatic coloring!  The Stampin' Up! exclusive
Curly Label punch (119851) was used for the sentiment.


I had quite a bit of fun with this set,
so stop by or subscribe if you want to see more examples of  how
this set makes effortless and beautiful cards!

The little treat is an origami fold I learned years ago.  I will give
more details on how to do this later this week. . .
The front element is a sentiment from the Regarding Dahlias
stamp set-sweet and simple baby!


Layer it up!  Dimensionals all over the place :)

Stampin' Up gave me the paper for free this month!
I used the new Bold Brights Designer Series Paper Stack.

For my local ladies, there will be a treat for anyone
who brings a friend to Stamp Camp in July-
24 inches of new ribbon, and some fun new embellishments!  Woot!
 
  Thanks for taking the tour!  Next stop-Connie Tumm!


Sunday

You've got mail. . .


Time for some February
Creative Crew projects!

This little mailbox is for my daughter,
to replace the tired one she has
had for five years. . .


Every time I have to go somewhere overnight
without her, 3x3 cards mysteriously
appear in her mailbox. . .

She was so amazed by this when she was
younger :) I called it mommy magic!

Here you can see the little Love trinket
from the Trinket Hearts accessory.


The paper used for this is
Twitterpated Designer Series Paper-
found in the Occasions Mini, as
well as Melon Mambo cardstock.


Some rhinestone bling and satin ribbon
and we are good to go!

Some fun treats in here and it will
be a sweet little surprise on the 14th. . .

Stamps: none
Paper: Twitterpated DSP, Melon Mambo
Other stuff: Trinket hearts, Rhinestones, Basic
Grey satin, large heart punch, heart trio punch, big shot,
heart of hearts embosslit, dimensionals

Wednesday

Creative Crew-January Edition wrap up. . .


Good Morning!

Wrapping up the January Creative Crew
projects. . . so I can share February's
with you! Sooner rather than later :)

Here is a Valentine's Day
wand I made for my 3 year old:


I am sure it will be much more
appreciated than a card at her age!

I also made a banner to hang for the holiday:


Both the wand and the banner
use the new Stampin' Up! Framelits.

I have both the heart and label sets
and they are so wonderful. . .

Please sir may I have another?
Shape that is!

Here is the centerpiece I made for
the kitchen table:


I need to find a new vase, as we left
for a weekend and when we got home
the cat had knocked it over!

My fault!

I had set it on the windowsill so I
could wipe down the table. . .

His territory :)

I will be back soon with more fun
Creative crew projects. . .

Saturday

Freaky Clean. . .


Here we go again!

The Freak tour has arrived, and this month we are
keeping it nice and clean for ya :)

Clean and Simple (CAS) that is!

You may have arrived here from Jan Tinklenberg's blog,
or maybe you were stopping by to see me?? Awwww!

Either way, you can make the loop around and see some
fabulous projects, all CAS, and all Stampin' Up!


My first project is one of my favorite-the scalloped
square notecard made with the BigShot.


I had some fun with the Stripes Textured
Empressions Embossing folder. . .little slanted
stripe for interest!

Sometimes your favorite people need a little happy mail.


Look at that darling little percolator stamped with
Stazon on Brushed Silver cardstock! Supa Cute!

I used my hobby blade to cut the inside of the handle. . .


Now *this* is my kind of treat holder!


I made this using the Movers and Shapers XL Die,
adding a few score marks. . . .


A top note, not full size, to keep it closed
and make it purty.

And then some coffee, to make it all better.


Because it cures what ails ya. :)

Hope you had fun taking a peek at my projects, and
now it's time to head over to Dawn Olchefske's
blog! Have fun, and see you next time!


Wednesday

The Freaks are at it Again!


So excited to show you a couple fun things this month!

If you have just arrived here from the lovely Cindy Major's blog,
I'm sure you are still reeling from her creative talent!

If you are just arriving, click on the link at the bottom
of this post and you will make the rounds to some amazing projects
using 100% Stampin' Up products. As always!

To start, I made a little purse gift box:


You could easily hang this on a door handle also (my favorite)
as a surprise for your favorite friend or family member. . .

The focal point, as well as the box use my favorite:
Spice Cake Designer Series Paper


Plus lots of pearl bling!

This is the inside view. . .If you don't have a Simply Adorned
Charm and necklace I demand you get one immediately!


They are too gorgeous, and versatile, to pass up.

This one is going to pull double duty as a Wine Tag
for the lovely person who cooks me Thanksgiving dinner.

Any takers???


Looks like I will be wearing this one myself. :)

Link
I'll break these projects down for you when you aren't
enjoying our lovely Freaky blog tour!

Head on over to Gretchen Barron's blog and be inspired!
Thanks for stopping by!


Saturday

October is HERE!


I am in my element :)

I have already watched Nightmare before Christmas several times.

No, I am not kidding!

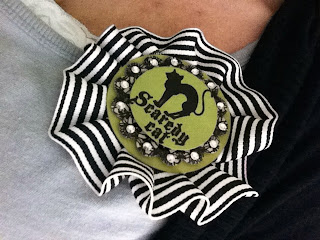
To celebrate entering my absolute favorite time of year I made a pin
that SHOUTS Halloween at you! I love this holiday!

Just being silly and having lots of family fun. . .


Don't you just love it??? Say yes!
I have been wearing it all day.
The day before that? It was living on my bag.
It makes me happy.

Another reason to celebrate October is a new Online Class!!!
Better yet, the class is free!!!

This is the first project in a set of tutorials that will be given (free of charge)
to anyone who places an online order of 35.00 or more from my website!


In conjunction with my friend Emma over at Lady and the Stamp,
We are pleased to offer you the very first project in our
Online Ordering Tutorial Blitz!

If you place an online order through my website of a $35 value or more you will receive NINE step-by-step tutorials FREE OF CHARGE, delivered direct to your email.

We have included everything you need for your Halloween Celebrations!

All projects are planned around the Frightful Sight Suite of Products :

Scaredy Cat Stamp Set

(wood mount-122555) $19.95 or

(clear mount-122557) $14.95

Frightful Sight Designer Series Paper (122351) $10.95

Black 1 ¼” Striped Grosgrain Ribbon (115615) $9.95

Totaling $35.85 for clear mount or 40.85 for wood mount


Check back over the next few days for more fabulous sneak peaks!

Can't wait to share some more fun projects!

(To take a hands-on class with these projects locally, contact me via my Stampin' Up Website and we will get you signed up!)

Monday

Happy Freakin' Halloween!

Yay!

I hope you enjoyed Lisa's extra fun projects,
and are inspired to make some treats to share with those you love!

This month's theme? Fall Into Step -- Autumn, Halloween and Thanksgiving Ideas

I have used some of Stampin' Up's amazing Frightful Sight Product Suite
to hopefully get you "in the mood" for a great Holiday! (IBC p.22)


Two fun things to share today. . . .

First, a card with a little gift attached!

This set, Scaredy Cat, makes a dramatic embossed image. Here I used Basic Black embossing powder with versamark ink on both Basic Grey and Whisper White cardstock.

In the picture below, the spider comes standard on this sheet of Frightful Sight Designer Series Paper. . . However, the upper right corner of the card needed one too! I added him (in the picture above) with Versamark and Black Embossing Powder.

Above you can see the 1 1/4 in. circle punch in Dusty Durango,
clipped with a darling little clip from our Clips Assortment. Fun times!
Of course the Basic Black 5/8in. Satin is so gorgeous. . .

I love this little ghost! On a dimensional he steals the show :)


But wait!

What if you could take off the front panel and keep it forever and ever???

Here you can see the detachable bookmark:


Because people are impatient, and I was worried the project might be ripped in the frenzy of trying to open such a cute card. I attached the bookmark inside the front panel to avoid issues :)

Below you can see where I added some dotted lines to show where to cut it off:


Last but not least. . .A spooky fancy favor.

Frightful Sight Designer Series Paper run thru our Big Shot. . .

then add a little punched Ghost to match the gorgeous paper!


(I took pictures of the process, so I will post those in a day or two if you are
interested in recreating this little cutie patootie.)

In the set Tiny Tags is where you will find this adorable Boo stamp. Perfect!


Punch it with our Jewelry Tag punch, tie a pretty bow in the
Black Satin Ribbon that I ADORE. . .
attach with some Vintage Trinkets and you are good to go!

Hope you had fun checking these projects out! Time to head on over to
Deb Currier's blog and see what she has made for your viewing pleasure!


Friday

Happy Freaky Easter


The Freaks are at it again! You probably arrived here via the irreverent and hilarious Brandy Wiggins-Cote (have you seen her scrapbook pages?!?!?)

If you are starting here? Welcome! Forward or backward this tour should give you a ton of Easter project ideas!


My first project was inspired by the uber-talented Gretchen Barron (a freak I might add!) and her mini matchbox drawer set. . . Ever since I saw that cutie I wanted to try it-but it hasn’t happened yet LOL!

Story of my life. . .


Anyhoo, I needed a bigger one so I used our Box #2 to make this dresser card kit for my oldest daughter. She is a crafty girl like her momma tries to be, so I wanted to make her something fun for Easter that she could make things with.

Some punched images, layers for them, ribbon, crayons. . .and an hour or two that mom doesn't have to entertain! Priceless!

I cut off the top of the box flaps, and cut some drawers from our So Saffron paper. I don’t know if you can see them, but I used little bead “spacers” behind our flower brads to give them a little boost! Stole ‘em from my daughter’s bead box. . .don’t tell!


But not every Easter project has to be that involved, right?

Here is a cutsey treat made with our Hugs Notes that can be found in the Occasions Mini catalog:


The super cute bunny is from the hostess set Picnic Parade (Occasions Mini), as are all the punched images from the above kit. He is cut out and layered on a 1in So Saffron circle.

That Satin Ribbon is a favorite right now :)

Inside the treat is a folded glassine envelope, with a few little chocolate eggs inside. Yummy!

Speaking of Hugs Notes. . .I have some folded in half to go with the kit above for making her little notecards. Just the right size for passing around at school!


That's it for this stop, and now you are off to visit Dawn Olchefske (love her!!) and see what she has to WoW you with . . . Have fun, and get stamping!


Sunday

Happy Daddy’s Day!

I am missing my hubby today.

So in his honor, I am posting the project I made for him. . .as did my club members in May. Happy Daddies all over the place!

09June 027.5

You may have seen this brag book before. . .I posted another one *here* and there is also a link to the splitcoast tutorial on that post.

You should make one of these! It is fun and easy!

09June 030.5

The corduroy button is manly, right? And the twine? What man doesn’t like twine, I ask you?? Or trees?

It does have the color Sage Shadow, but if you call it blue-green when you are talking to him you should be fine. . .

09June 032.5

Of course, once he opens it and sees all the pictures of his favorite little people, he won’t care what color it is :)

I put some coordinating colored page protectors in there, which allowed for some artistic expression by my 6year old. Five double sided pages with photos, notes to daddy, and a lot of love.

I know he isn’t going to have it by today (apparently the mail is being interfered with b/c of weather), but I hope he gets it soon!

Deets:

Stamps: Thoughts and Prayers, Wonderful Favorites; Ink: Chocolate chip, Close to Cocoa (for sponging), Sahara Sand; Paper: Sahara Sand, Chocolate chip, To The Nines Designer Series, Sage Shadow; Other Stuff: Clear Translucent envelopes, Corduroy buttons/chocolate chip, hemp twine, chocolate chip taffeta, crop-a-dile, jumbo pewter brads

Saturday

Feelin' the Luv. . .


Here are a couple of samples from my Love U Much Bundle class. Luv'd the bundle! It was nice to have a class with discounted product, so everyone got a ton of goodies to take home.

I wanted to make a decent sized tin, instead of the usual smaller ones. Not all of my peeps have covered tins before, so they needed to know how! I love making tins for gifts, so it wasn't exactly a hardship :) These ones came from Walmart around Christmas time.


We didn't do modpodge on this. Just Candy Lane paper and sticky strip, along with Riding Hood Red striped grograin, and fun doodads from my accessories stash. The scallop on the top is the Scallop Circle big shot die.

Gotta love that Circle Scissors cutting tool!!! I was able to make a perfect size circle to go on my scallop circle, as well as the perfect mat in Riding Hood Red! Yay for awesome new tools :)


The candy holder was inspired by Jill Olson. I am going to hang it on my daughter's door on Valentine's day. She will love me forever :)

I used the Top Note die, with medium flat cello bags. The holes are punched with my crop-a-dile, and the ribbon is just threaded thru. Super easy!


This element is made of: scallop circle in Whisper White, metal edge tag, 1 3/8 circle in pirouette pink, stamped image punched with the 1 1/4in circle. The heart was cut out. Coloring was done with blender pens and Riding Hood Red ink.

Hope you are stamping this weekend!